Unix Layouts on any Keyboard with Kanata
05/01/2026
For just over a year now, I've been using the Unix keyboard layout on my devices using a key remapper called Kanata. It's been incredibly helpful for both my comfort and productivity and I'm writing this guide to both assist setup and give a brief history on Unix layouts and why I prefer them. An important detail is that this guide is Linux oriented however the config used should in theory work on Kanata's windows installation.
Firstly, you might be asking what a "Unix layout" even is.
An explanation of Unix layouts
Back in the 80s, computers didn't use the modern layout we are used to today.
Before Windows and GUI systems, many systems ran Unix and as such, provided a terminal-user-interface or TUI. Designers took note of this and computers such as the Amiga or VT100 and keyboards such as IBM's model F used a variation on the QWERTY layout optimised for terminal use.
These distinctions set the Unix layout apart from the standard we know today.
- Ctrl replaced Caps Lock's position next to the 'A' key. This was present in almost all Unix keyboards and is practically a defining feature.
- Backspace was sometimes placed above the enter key, rather than the backslash.
- The Meta key (also known as the Windows, Command or Super key) was placed next to the spacebar rather than next to Alt.
- In lieu of the tilde/backtick key, Escape take its place along the number row. Oftentimes, the displaced tilde key would end up where the shifted Backspace key used to be.
Beyond the new location of Ctrl, the Unix layout was never a formal standard and you'll find that different companies often only made a few of the changes rather than all of them in part due to the shift to the modern standard layout.
Notice the gaps between the alt and spacebar along with the ctrl key in place of caps-lock.
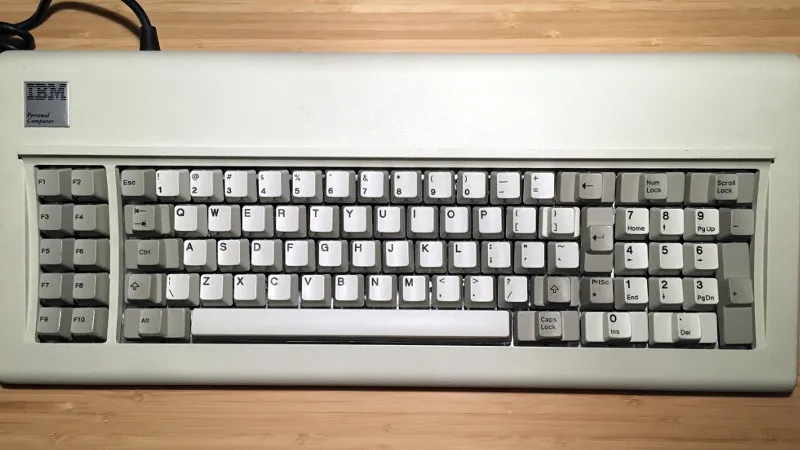
Here, the escape key replaces tilde. It has, however, been moved to beside the enter key rather above it. The Unix layout was never a standard and moreso a guideline for designers.
While the devices this layout originated from have long been made obsolete, the usability of the layout still persists to this day especially for programmers, sys-admins and even writers concerned with ergonomics.
Common keys such as Ctrl and Backspace have been moved such that they are either close to or directly along the home row. This means less movement to reach these keys and reduced likelihood of repetitive strain injury.
This design philosophy of minimising leaving the home-row is one of the core reasons for Vim's keybindings.
Kanata Setup
We now understand the history and reasons to use the Unix layout. Fortunately, if we want to use this layout in the year 2026, we don't have to spend money and time finding an ancient keyboard to use.
Using the keyremapper Kanata, we'll be able to bring the Unix layout to any device.
First we'll need to install Kanata. Assuming we are on Arch, we can install it from the AUR using our helper of choice.
yay -S kanata-binPermissions
Before we get into any configuration, we must first grant Kanata access to the kernel's input and uinput subsystem. This can be achieved via the use of udev rules.
These commands should set up everything we need:
sudo groupdel uinput 2>/dev/null
sudo groupadd --system uinput
sudo usermod -aG input $USER
sudo usermod -aG uinput $USER
Verify your username is part of the input and uinput groups with the command groups.
If you cannot see both, you may need to log out and login.
Once confirmed, load the uinput kernel module.
sudo modprobe uinputsudo tee /etc/udev/rules.d/99-input.rules > /dev/null <<EOF
KERNEL=="uinput", MODE="0660", GROUP="uinput", OPTIONS+="static_node=uinput"
EOF
sudo udevadm control --reload-rules && sudo udevadm triggerIdeally, everything should be ready for Kanata to use. If you want to verify you can use ls -l /dev/uinput and look for an output in the form of:
crw-rw---- 1 root uinput 10, <minor> <MMM DD HH:MM> /dev/uinputConfiguration
Configuring Kanata is very simple. While Kanata does provide a sample configuration file online, I'll show my own configuration as that is specifically for defining a Unix layout. After reading this guide, you'll be equipped to make your own changes to the configuration as you see fit.
(deflocalkeys-linux
  bck 158
  fwd 159
  pgup 104
  pgdown 109
)

(defsrc
  bspc
  \
  caps
  lmet lalt bck fwd ralt rmet
)

(deflayer base
  \
  bspc
  lctl
  lalt lmet pgup pgdown rmet rctl
)
I'll provide a brief explanation for each component within the file.
defsrc and deflayer:
"defsrc" and "deflayer" can be explained together as both sections are used for all remappings on Kanata.
"defsrc" refers to the keys on the original keyboard that will be intercepted and remapped by Kanata while "deflayer" shows the new mappings of the keys. For example, the backspace key defined in "defsrc" is now the backslash key as shown by "deflayer".
While not necessary, it's intuitive to define keys in "defsrc" in the order they appear on the keyboard, in a way "mirroring" your own layout. For example, if you wanted to remap an entire keyboard to use DVORAK, your "defsrc" would likely look something like this:
(defsrc
  grv  1    2    3    4    5    6    7    8    9    0    -    =    bspc
  tab  q    w    e    r    t    y    u    i    o    p    [    ]    \
  caps a    s    d    f    g    h    j    k    l    ;    '    ret
  lsft z    x    c    v    b    n    m    ,    .    /    rsft
  lctl lmet lalt           spc            ralt rmet rctl
)

(deflayer dvorak
  @grl 1    2    3    4    5    6    7    8    9    0    [    ]    bspc
  tab  '    ,    .    p    y    f    g    c    r    l    /    =    \
  @cap a    o    e    u    i    d    h    t    n    s    -    ret
  lsft ;    q    j    k    x    b    m    w    v    z    rsft
  lctl lmet lalt           spc            ralt rmet rctl
)
Technically, "deflayer" refers to one of many potential "layers" or key layouts in Kanata which you can switch between hence why I've named by only layer base. However since I personally don't use layers, I can't comment much on them. If my workflow becomes more complex and I end up using them, I'll revisit this article with an explanation. Until then, one by Kanata can be found here.
defalias
For slightly more complex keybinds we can hide their details behind aliases.
(defalias
  altCaps (tap-dance 200 (lalt caps))
)
This alias defines a "tap-dance" - a term known those familiar with QMK firmware - that maps rapid double taps of the left alt key to Caps Lock.
Aliases can be used in "deflayer" using the '@' symbol.
(deflayer base
  @altCaps
)
deflocalkeys
In some instances, your key might be vendor-specific and as such may not have an official descriptor by Kanata in "defsrc". Those edge-cases can be handled using "deflocalkeys" which allows custom keys to be defined via their keycode. As an example, my Thinkpad T420 has dedicated back and forward buttons for navigating browser history.
I had no use for these keys so I wanted to bind them to PgUp and PgDown. Since Kanata doesn't define these keys specifically I had to define them manually.
Finding keycodes can be done via applications such as xev or wev which report the keycodes of any keypresses. xev works on X11 systems while wev is for Wayland.

Systemd Configuration
Now we have our Unix layout config file tweaked to our liking, we can test our config by running Kanata and passing the path of our configuration file. Give Kanata a few seconds to startup.
kanata -c /home/john/.config/kanata/kanata.kbdAfter confirming functionality, we'll create a Systemd service to run Kanata at boot.
[Unit]
Description=Kanata keyboard remapper
Documentation=https://github.com/jtroo/kanata

[Service]
Type=simple
ExecStart=/usr/bin/kanata --no-wait -c /home/%u/.config/kanata/kanata.kbd
Restart=on-failure
RestartSec=3

[Install]
WantedBy=default.target
Create folders systemd/user using mkdir -p if needed.
Then start the service:
systemctl --user --enable --now kanata.serviceIf all goes well, you'll now be able to use the Unix layout on your non-Unix keyboard. No need to spend $300 on a Happy Hacking Keyboard.
For the sake of brevity, I've cut down the content of this article significantly and focused more on showing how to get Kanata running with a small history lesson on the side.
Kanata's documentation can be found here for more advanced configuration.