How to Deploy WireGuard on Dokploy
02/05/2026
As part of the research process for another future article, I wanted to try Deepseek's paid models. However, I would quickly realise that my university's WiFi connection would block any requests to Deepseek's servers. The reasons for this decision are too politically spicy for me to discuss, and at the end of the day I just wanted to try out new AI tools. I wasn't prepared to spend on a VPN just to use my tools so I ended up deploying WireGuard on my Oracle Cloud VPS running the self-hosted PaaS Dokploy.
We'll be using a simpler variant of WireGuard called wg-easy since it bundles a web interface alongside the standard WireGuard installation, making management far simpler.
Another point to note is that we'll be using version 15 of wg-easy. This distinction is important as other guides I found online use the older version 14 which uses a different format for configuration.
For brevity, this guide will assume you've already set Dokploy up on your server.
Compose File
wg-easy recommends using Docker compose which aligns with Dokploy's preferred deployment method.
A notable difference from other guides is the lack of an environment mapping. This is because as of V15, wg-easy
now handles environment configuration within the web-ui's admin panel rather than directly in the compose.
Some amendments have been made to the file the wg-easy team provides,
notably the inclusion of Traefik labels to route traffic under wg.johnling.me to the dashboard running on port 51821.
My setup for rendering code didn't like the backticks. I've escaped them with backslashes that need to be removed.
volumes:
etc_wireguard:

services:
wg-easy:
  image: ghcr.io/wg-easy/wg-easy:15
  container_name: wg-easy
  labels:
    - "traefik.enable=true"
    - "traefik.http.routers.wg-easy.rule=Host(`wg.johnling.me`)"
    - "traefik.http.routers.wg-easy.entrypoints=websecure"
    - "traefik.http.routers.wg-easy.service=wg-easy"
    - "traefik.http.services.wg-easy.loadbalancer.server.port=51821"
  networks:
    wg:
      ipv4_address: 10.42.42.42
      ipv6_address: fdcc:ad94:bacf:61a3::2a
    dokploy-network:
  volumes:
    - etc_wireguard:/etc/wireguard
    - /lib/modules:/lib/modules:ro
  ports:
    - "51820:51820/udp"
  restart: unless-stopped
  cap_add:
    - NET_ADMIN
    - SYS_MODULE
  sysctls:
    - net.ipv4.ip_forward=1
    - net.ipv4.conf.all.src_valid_mark=1
    - net.ipv6.conf.all.disable_ipv6=0
    - net.ipv6.conf.all.forwarding=1
    - net.ipv6.conf.default.forwarding=1

networks:
wg:
  driver: bridge
  enable_ipv6: true
  ipam:
    driver: default
    config:
      - subnet: 10.42.42.0/24
      - subnet: fdcc:ad94:bacf:61a3::/64
dokploy-network:
  external: true
I don't have a domain!
You'll need to enter the raw IP along with the port 51821. This means that you'll need to add additional rules to allow TCP traffic on 51821.
You may instead use port 443 (HTTPS) to remove the need to specify explicit ports; however, I discourage this as it makes it far more difficult to set up other web services that may need the same port. A reverse proxy in this case is preferred.
Oracle Specific Tip
Use iptables to allow traffic on UDP through port 51820, though this may not be strictly necessary.
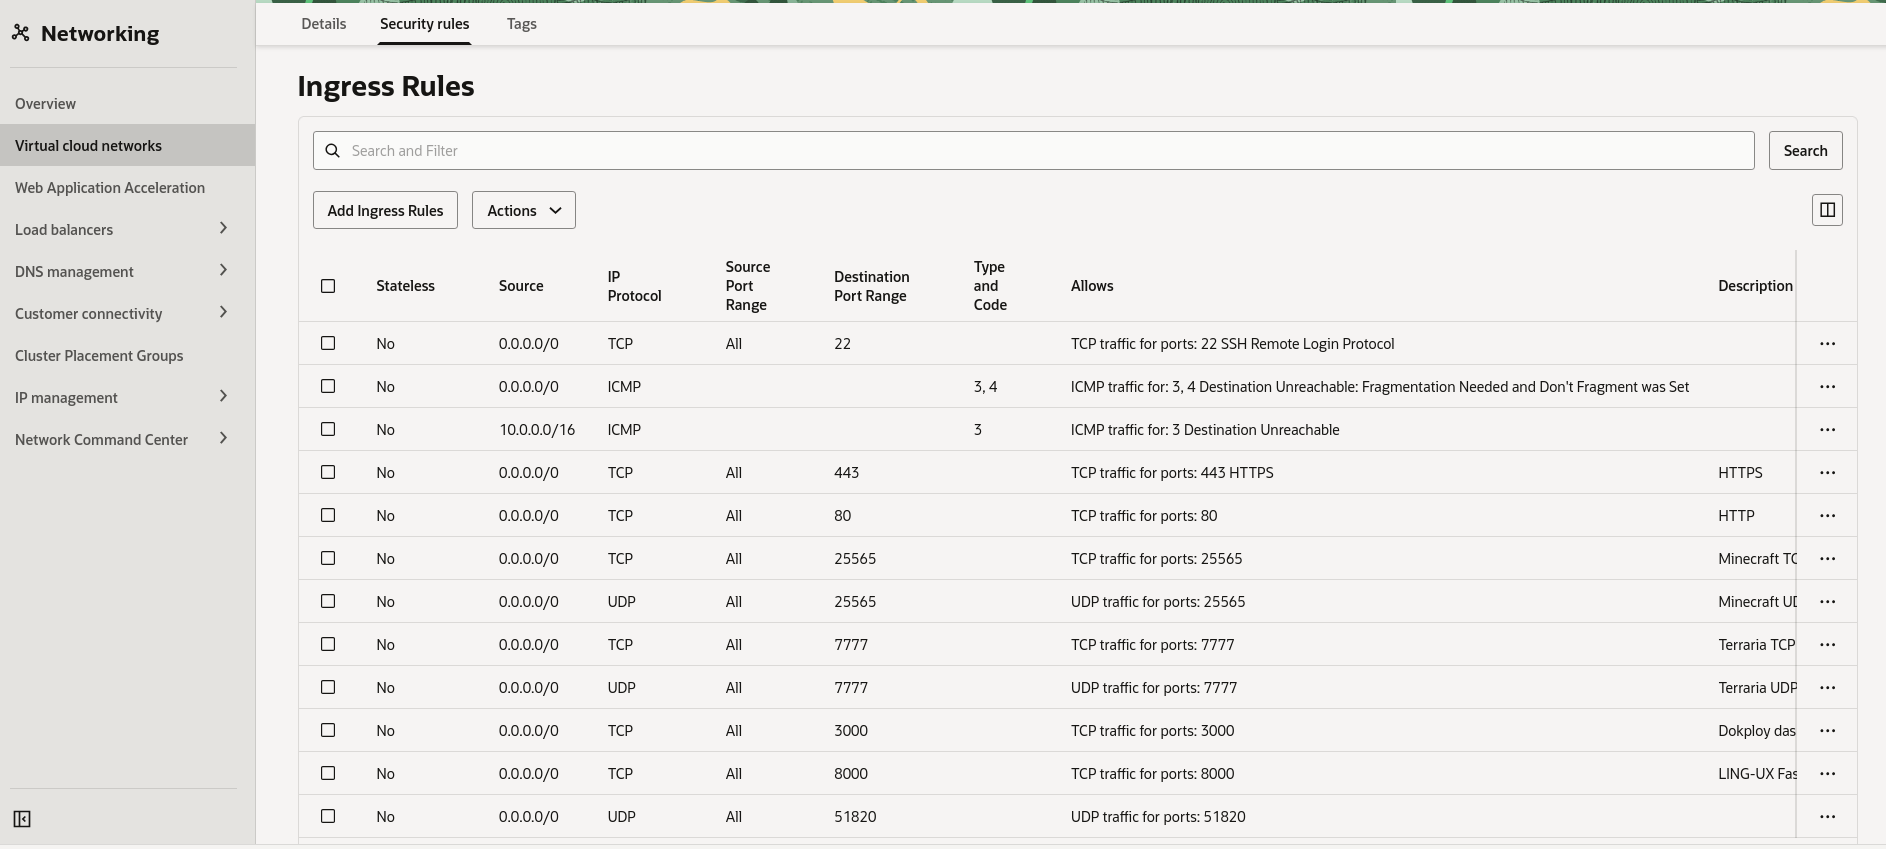
In addition, Oracle Cloud uses an additional layer of security rules for the
Virtual Cloud Networks their servers are deployed to. Alongside allow-listing on the VPS's firewall, you'll need to add an extra ingress rule
to allow UDP traffic on 51820 - same as the rule set for iptables.
Testing and Setup
Once done, try accessing your instance using the domain you've assigned or IP address of your VPS.
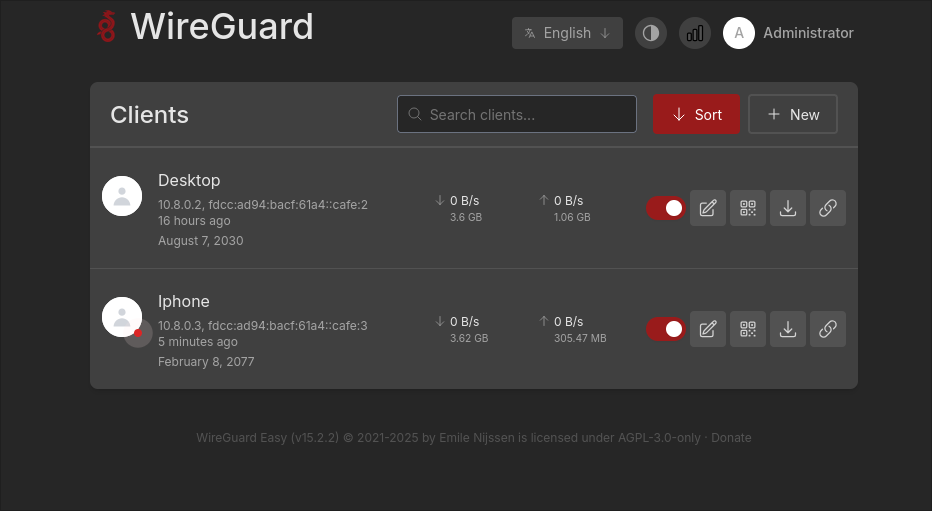
If successful, you'll be directed to a setup page where you can create your username and password. These details are not saved anywhere
nor does wg-easy provide an easy way to reset your details, hence I recommend keeping those details somewhere in case you forget.
Once done, adding new clients is incredibly easy - enter a name and an expiration date and wg-easy will handle everything else.
You're now ready to use WireGuard on your devices.
Mobile:
Download the WireGuard mobile client and create a client using QR code.
All clients on the wg-easy dashboard should have a QR code to scan to complete the onboarding.
Desktop:
For Linux, I installed wireguard-tools for Arch which gives me access to the wg-quick command. The resolvconf command will also be needed
so install it through your package manager.
By default, wg-quick reads from the configuration file /etc/wireguard/wg0.conf. Download your WireGuard client's configuration from the dashboard,
then rename and move it.
You'll then be able to connect using the wg-quick command.
sudo wg-quick up wg0 # connect
sudo wg-quick down wg0 # disconnect
You may need to run resolvconf -u to update your /etc/resolv.conf.
Troubleshooting
This section may be updated with problems I encounter as I continue to use the service.
Can't Access the Internet While Connected
If connection can be established, but websites cannot be reached, I would immediately look towards your firewall rules. Double-check and make sure they are configured correctly and even get a second opinion. Also recall that Oracle's servers will also require additional rules set in the cloud dashboard.
If that does not work, try checking the contents of /etc/resolv.conf - there should be a DNS server present. Otherwise,
you can edit /etc/resolvconf.conf and add a name server in the format name_servers={ADDRESS}.