UEFI Coreboot on the Thinkpad T420
13/06/2025
If you're anything like me, you have an appreciation for the older devices of the 2010s.
For the last 8 months I've been using a Thinkpad T420 as my daily driver, replacing my T15 of 4 years. Alongside the incredible typing experience, I heavily modded this laptop to maximise its potential and usability as my laptop.
One of these mods was flashing a custom open-source BIOS, Coreboot to replace the standard one provided by Lenovo.
Why Use Coreboot?
Alongside all the FOSS goodness GNU fanatics love and the potential (although debatable) security benefits paranoids love, Coreboot offers very tangible performance benefits for normies like me who just want a good computer.
-
Higher RAM speeds are allowed on Coreboot enabled machines: The performance increase however may not be incredibly noticeable.
-
Ivybridge CPUs from the T430 can be installed into the T420: I've done this myself with an I7 3632qm and did notice a clear increase in performance especially when compiling programs. While 2nd-gen quad cores exist, they have a TDP of 45W instead of the 35W Ivies use meaning even worse battery life and heat. Compatible 3rd-gen CPUs can be found here.
-
Removal of the WiFi whitelist allowing for any card to be installed: I installed an AX3000H card to get WiFi 6 and boosted my download speeds from 50 to 150mbps on my University's WiFi (probably the best in Australia which isn't saying much).
-
Custom bios screens: I didn't do that but if you want to tell others you use Arch at boot-time that's an option.
Out of all of these features, the removal of the whitelist and the ability to use Ivy Bridge CPUs in my laptop were the biggest appeal for me.
My T420 now has a quad-core I7 and a WiFi-6 capable card and honestly it's been great for my university work. I even developed my entire website on this device over the Summer.
Why UEFI?
TLDR: You want UEFI because you'll be able to dual-boot Windows 10/11 and Linux easier. While Windows 10 and 11 can definitely be installed on legacy BIOS, to be honest, the world has moved to UEFI. Unless you have very specific reasons to use legacy, UEFI will be the standard going forward and will be assumed for many guides in the future.
I wrote this guide because the majority of Coreboot guides install legacy BIOS Coreboot with SeaBIOS. Initially I followed those guides but found that I couldn't boot my Windows USB drive. While I could have created another drive, I wanted Coreboot to upgrade my computer not to make compromises.
Since many devices today will use a modern UEFI, I decided to go for that with Coreboot.
Read Before Proceeding
This is a very involved process which at a minimum includes these steps:
- Installing Windows 7 to update the Embedded Controller
- Complete disassembly of the machine to gain access to the ROM chip
- Attachment of a clip (or soldering of pin headers) to the motherboard
- Flashing a new firmware with the potential (very rare) to leave your laptop in an unusable state.
That being said, if you've already gone looking for Coreboot information and found this article, you've probably heard this said before. If so don't let me stop you from doing this. You'll definitely have a unique machine fit for an enthusiast.
Prerequisites
This guide will cover using the Raspberry Pi Pico + Ponoma 5250 SOIC clip for programming. I used to use Ch341A programmer which many other resources recommended. However, I have have since stopped using it after a series of failed/inconsistent reads and writes that ended up losing me a motherboard.
In addition, the maintainers of Libreboot have a whole slew of reasons not to use the CH341A. Compared to other guides which use a full-size Raspberry Pi for flashing, the Pico is significantly cheaper and easier to use. Though you may find the CH341A to work (my initial attempt worked using it), we'll be using the Pico going forward.
- Raspberry Pi Pico: Will act as our SPI Programmer
- Ponoma 5250 SOIC Clip + 8 jumper wires: This is the only clip that I've been able to reliably use for programming. Highly recommend using whether you use the Pico or Ch341A
- 8 Female Pin Headers + 8 jumper wires (Optional): If the clip does not work for flashing we can solder these headers to the board and attach jumper wires to them.
- Isopropyl Alcohol + Cotton Buds or Alcohol wipes for cleaning contacts which may aid in getting a good read.
- A Thinkpad T420 with Windows 7 installed (this is important)
- A second Linux computer to build and flash Coreboot.
- An ESD wrist strap: I've had a T420 motherboard die on my while tinkering so I recommend to use one when doing this.
Updating the EC via Windows 7
Before we start, we need to update the embedded controller on the Thinkpad T420. While anecdotally, I haven't seen any problems skipping this step, I would still recommend putting in the extra time now rather than having to deal with problems later. This is because updating the EC can only be done using Lenovo's BIOS which means once you Coreboot your machine, you will need to flash the old BIOS back if you want to update the EC. In Windows 7 you'll want to download the BIOS update utility and run it. Make sure your device is plugged into power.
Once this update is complete we can forget about Windows 7.
Physical Setup
I'm not going to walk you through how to disassemble the T420 for the sake of brevity. This video, while long, does show you how to go about taking the laptop apart.
I told you this process was involved.
Following the video correctly, you should have the motherboard exposed.
At the bottom of the board there will be a small black chip below the chipset. That's our ROM chip that we want to flash Coreboot onto. However before we do so, we must make a backup of the original firmware such that if we mess up, we can put it back to restore functionality.
Flashing Serprog onto the Pico
To use the Pico as a SPI programmer, we'll need to install Serprog onto it. First we'll need to install the Pico SDK:
Debian based:
sudo apt install cmake python3 build-essential gcc-arm-none-eabi libnewlib-arm-none-eabi libstdc++-arm-none-eabi-newlibArch based:
sudo pacman -S cmake arm-none-eabi-gcc arm-none-eabi-newlib git base-develFedora based:
sudo dnf install -y git cmake gcc-arm-none-eabi arm-none-eabi-gcc-cs-c++ arm-none-eabi-newlibClone the repo:
git clone -b master https://github.com/raspberrypi/pico-sdk.git
cd pico-sdk
git submodule update --init
Afterward, we can clone the pico-serprog repo and build a binary.
git clone https://github.com/stacksmashing/pico-serprog.git
cd pico-serprog
PICO_SDK_PATH="PATH_TO_PICO_SDK" cmake .
make -j$(nproc) -l$(($(nproc) + 1))
Hold the BOOTSEL button on the Pico while plugging into your computer; if successful, you should be able to access it as a storage device.
Drag the compiled pico_serprog.uf2 into the root of the Pico and now we can use it as a flash programmer.
Attaching the programmer
Attach the clip to the BIOS chip, aligning the pins with the Pico.
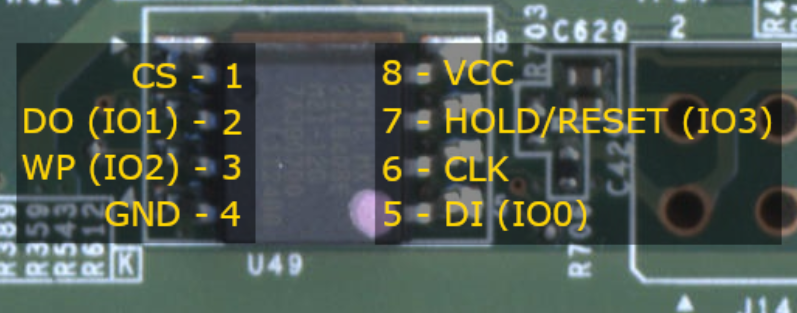
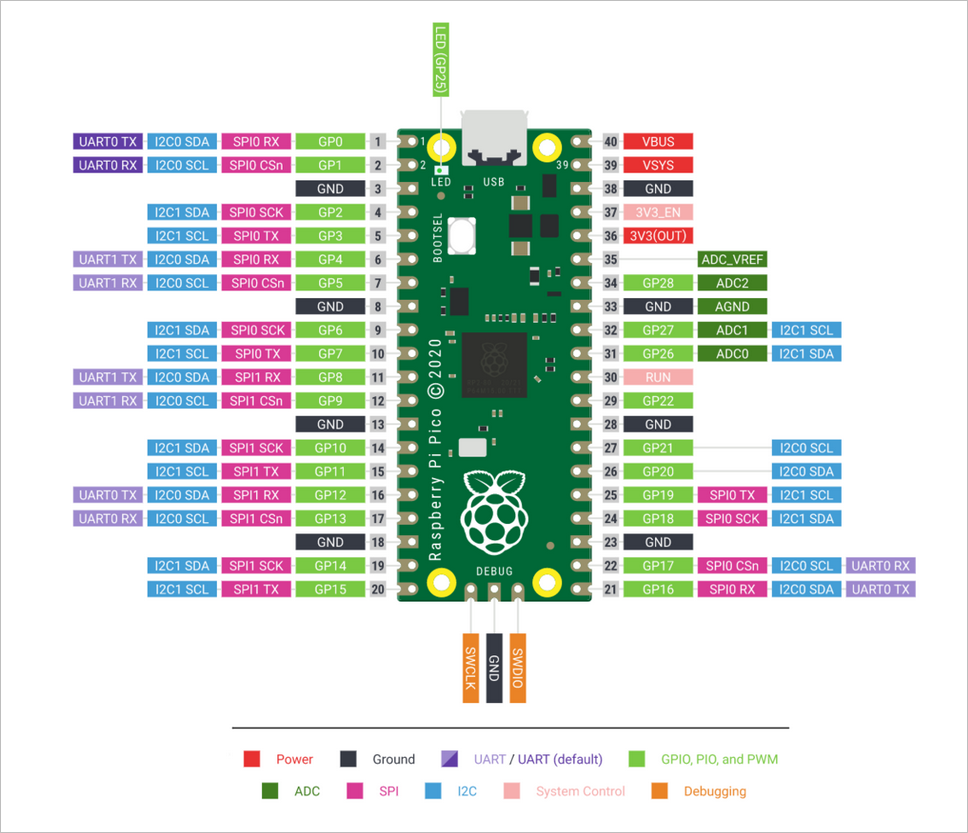
| BIOS | Pico |
|---|---|
| 1 | 2 |
| 2 | 36 |
| 3 | 6 |
| 4 | 38 |
| 5 | 5 |
| 6 | 4 |
| 7 | 36 |
| 8 | 36 |
WP and HOLD need to be pulled high to 3.3V hence they'll need to be connected to pin 36 alongside VCC. Consider using additional jumper cables to act as 2-1 adapters to condense three cables to one.
"I can't read anything off the chip" / my clip won't fit"
This is especially common with cheap clips that come with the CH341A. The simplest solution is to buy the Ponoma clip which doesn't have this issue. Though if you really want, you can solder pin headers to the board via the holes to the right of the chip although I would recommend against this since heat could damage parts of the board.
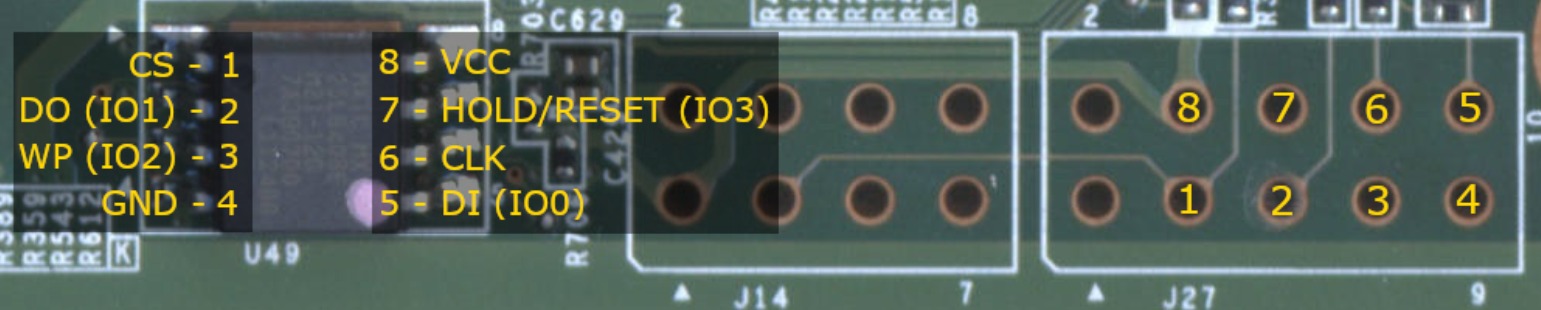
If you know how to solder great! If not there's a first time for everything and soldering videos are incredibly common on youtube.
Once you get those pin headers on the board. Connect your jumper pins to the programmer.
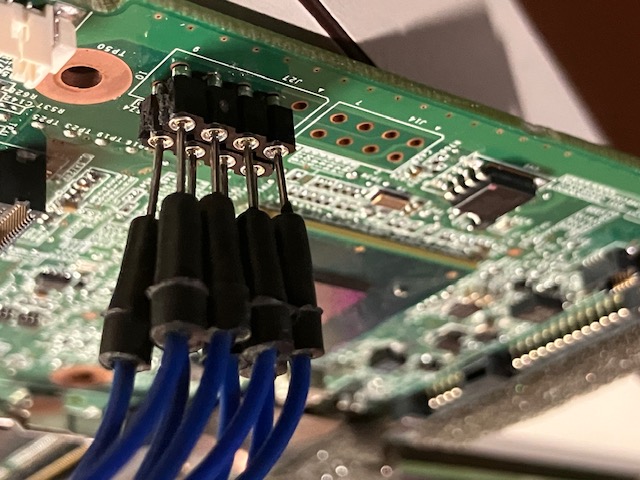
Preparation
This process may take anywhere from 5 minutes to an hour depending on your preferences. You can either flash a pre-built image such as my own or you could build an image yourself. If you just want a decent Coreboot build quickly, I'd suggest using my own or someone else's and skip the next section.
IMPORTANT: My laptop used to use an MPE-1800AX WiFi card however any newer version of Coreboot just didn't work with it. I believe this may be the fault of the WiFi card's design including similar models such as the AX210. I'm currently working to try figure out what is happening. If you know you have this WiFi card or a variant, you may want to consider using my config as it's guaranteed to work. I myself have not been able to build a new Coreboot image for my laptop without serious QoL problems with brightness and sleep. If building your own image, I suggest starting with the Coreboot image 2026-04-09_5267cae13a as it has created builds that work for me. Building Coreboot from scratch is fun but take this as a warning before you proceed especially if you want the latest version.
Building Coreboot from Scratch (optional)
Building Coreboot involves 4 steps
- Cloning the repo
- Extracting blobs from the Intel Firmware Descriptor (IFD) inside the BIOS chip via
ifdtool(way easier than it sounds) - Creating a config for Coreboot
- Compiling Coreboot itself
Coreboot, especially when trying to maintain older builds like mine, can be incredibly fickle and changing dependencies may render my guide outdated. In addition, Coreboot requires a specialised cross-compiler to build images that can be flashed to a BIOS chip. Building this cross-compiler is a very time-consuming process. I've found that the best way to have consistent behaviour across machines and skip building the cross-compiler is through Coreboot's own development Docker containers. As such, Docker is the first thing you should install before proceeding.
Guide for Debian-based distros
Guide for Fedora-based distros
Once Docker has been installed, you'll want to pull down coreboot's latest development image:
docker pull coreboot/coreboot-sdkNext, install flashrom, the tool we'll be using to flash Coreboot.
Debian-based:
sudo apt install flashromArch-based:
sudo pacman -S flashromFedora-based:
sudo dnf install flashrom -yDownload the Coreboot source code:
git clone https://github.com/coreboot/coreboot.git
cd coreboot
git submodule update --init --checkout
mkdir -p 3rdparty/blobs/mainboard/lenovo/t420
Build ifdtool. This program will be used to extract binary blobs from our firmware by reading from the
Intel Flash Descriptor (IFD)
cd util/ifdtool
make -j$(nproc) -l$(($(nproc) + 1))
Backing Up BIOS
It is wise to copy the BIOS off the chip a backup in case things go wrong.
Run flashrom to extract the BIOS. You may have to explicitly provide a chip name using the -c flag.
After the first read, we'll repeat this 2 more times since we will compare them to ensure a good read.
flashrom -VVV -p serprog:dev=/dev/ttyACM0:115200,spispeed=12M -r t420_1.rom
flashrom -VVV -p serprog:dev=/dev/ttyACM0:115200,spispeed=12M -r t420_2.rom
flashrom -VVV -p serprog:dev=/dev/ttyACM0:115200,spispeed=12M -r t420_3.rom
sha512sum t420_*.romIf all the hashes match, then we can assume our ROM is good.
cp t420_1.rom backup.romExtract the binary blobs using ifdtool.
~/coreboot/util/ifdtool/ifdtool -x backup.romRename/remove the extracted blobs. Then move them into our Coreboot directory.
mv flashregion_0_flashdescriptor.bin descriptor.bin
rm flashregion_1_bios.bin
mv flashregion_2_intel_me.bin me.bin
mv flashregion_3_gbe.bin gbe.bin
cp descriptor.bin me.bin gbe.bin ~/coreboot/3rdparty/blobs/mainboard/lenovo/t420/
To create a config for Coreboot we'll need to enter the Docker environment using the image we obtained earlier. Ensure you are inside the directory with Coreboot and run this Docker command.
docker run -it --rm -u 1000:1000 -v $(pwd):/home/coreboot/coreboot -w /home/coreboot/coreboot coreboot/coreboot-sdk /bin/bashYou should be taken to another shell with "coreboot" as your username. To build your config, make sure you have at least these settings enabled. Using the ? key on each option will give you a bit of information so feel free to explore the config.
cd coreboot
make nconfig
General
- Use CMOS for configuration values
Mainboard
- Set Mainboard Vendor to Lenovo and Mainboard Model to Thinkpad T420
- Set the CBFS (size of Coreboot owned area in ROM) to 0x300000
Chipset
- Optionally enable the 2 [OVERCLOCK] options.
- Support Bluetooth on WiFi cards
- Add Intel descriptor.bin
- Add Intel ME/TXE Firmware
- Add gigabit ethernet configuration
- Optionally select "Strip down the Intel ME/TXE firmware" to neutralise the Intel Management Engine using
me_cleaner. If problems arise after flashing with it enabled, disable the setting.
Devices
- Set graphics initialisation to use libgfxinit for UEFI support
- Set Display -> Framebuffer Mode to Linear "high-resolution" framebuffer
- Check "Show graphical bootsplash" and set the resolution to your screen
- Enable PCIe Clock Power Management
- Enable PCIe APSM L1 Substrate
Generic Drivers
- PS/2 Keyboard Init (this is actually important my computer didn't boot with this disabled)
- Support for either Intel or Mediatek WiFi cards should be enabled by default. If not enable them.
Payload
- Set Payload to add to edk2 payload (UEFI)
- Use Escape Key for Boot Manager and set boot menu timeout to 1 second
- Center logo 38.2% from top of the screen.
Once done, hit escape and save the .config file.
Since our image ships the cross-compiler for us, we can simply start building our image using make:
make -j$(nproc) -l$(($(nproc) + 1))If successful, your final image can be found in builds/coreboot.rom
Flashing Coreboot
At this point you should have either your own or prebuilt image.
Just like how we used flashrom to read our ship, we can use the same command to write as well:
flashrom -VVV -p serprog:dev=/dev/ttyACM0:115200,spispeed=12M -w coreboot.romGive some time for the programmer to write the data. Since we ran with the verbose flag we'll see a lot of output which is good as it means we'll be able to tell if something has gone wrong. The process should take a bit of time. Just be patient and wait for the output to stop. Once done, power off the machine and power it on.
Troubleshooting
"My Screen is Black what do I do?"
Firstly don't panic my screen was also black the first time I did this. It's only in extremely rare cases where a bricked laptop is truly gone.
Fix 1: Reseating the CPU
When I initially flashed Coreboot, I found my laptop had a weird issue where pressing the power button would only cause it to glow but nothing starts up.
This really confused me for the longest time. However I found the solution was to reseat the CPU. The key here is to not completely tighten the lock for the socket. Only tighten it enough so the CPU doesn't move.
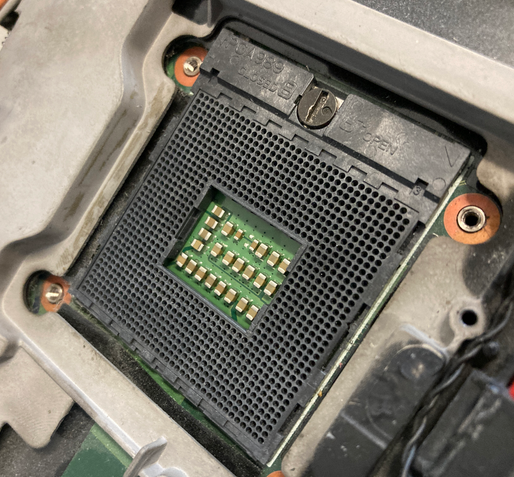
See that circular notch at the top? You want to turn that with a screwdriver but don't apply too much force.
Fix 2: Reflashing the BIOS
In the worst case scenario where you need to flash the original BIOS back, run the same flashrom command using your backup.rom instead of coreboot.rom
flashrom -VVV -p serprog:dev=/dev/ttyACM0:115200,spispeed=12M -w ~/backup.rom"Booting from X Failed: Verify it contains a 64bit UEFI OS"
I had this problem as well immediately after flashing Coreboot to my machine. For me, the solution was to boot a live Linux USB and reinstall GRUB bootloader.
Updating Coreboot in the Future
Linux
If you are on Linux (which if you're following this guide you probably are let's be honest) updating Coreboot can be done via the "internal" programmer in flashrom.
You may need to provide iomem=relaxed to your kernel boot parameters.
flashrom -VVV -p internal -w new_coreboot.romWindows
Windows users will still need to use the external flashing method we covered in this guide sorry :(
Summary
If everything has gone right, you should now have a Thinkpad T420 running an open-source UEFI firmware you compiled yourself. That's got to be kind of cool. I think it is.